


Step 6 - Detail First Pass

Finished Puzzle
Sitting down for my daily toon, i scribbled an artist scribbling himself. That concept has been done to absolute death so what’s the next best thing? As you see here, it happens to be the joy of puzzling. And now…for the workshop tutorial for anyone interested.
First, The sketch. The binding on the left is my actual sketchbook rings. I usually cut or erase those out, but it seemed to add something to the drawing as I went along.

Step1 - The Sketch
As usual, I scanned it at around 200 dpi. I prefer good resolutions to begin with (300dpi for print) because you never know when one of your daily trash drawing will be a hit. You don’t want to have to redraw the image at a higher resolution. Also keep in mind, the higher the resolution, the slower your programs run, and the slower your complicated brushes will draw. 72dpi is perfect for web-only and experiments.

Step 2 - Lineart
Step 2 – Lineart
Now I’ve decided to paint this as quickly as possible. For myself, this means a new layer -100% opacity- and a hard brush for outlines. I’ll make underlayers later for fast watercolor washes. In this case, it’s Corel Painter 11, and the THICK N THIN PEN brush. I choose colors complimentary to what I’ll underpaint them with.

Step 3 - Hard Lines
Step 3 – Hard Lines
I draw the windows with the pen tool. I typically stay away from such hard lines and right and square angles unless Im illustrating vector graphics. But in this case, I wanted to flesh out the idea FAST. So I use the pen and straighten out the windows.

Step 4 - First Wash
Step 4 – First Wash
Now we make a new layer set to MULTIPLY. Grab your favorite washing brush (DIGITAL WATERCOLOR- COARSE MOP for me) and throw down some color. What you see above is only a couple strokes of color…but it fills in fast.

Step 4 Wash
Step 5 – Cleanup
With a blunt tool I select the canvas layer where the pencil drawing is embedded, and begin cleaning up the extraneous pencil marks and stray scribbles. Im using PASTELS- ARTISTS CHALK for this since it has a little bit of texture and the scan itsself has a texture to it. I immediately see any smooth marks are visible. Im painting directly on the canvas, over the pencil , with a locally selected color (whatever is next to the pencil Im cleaning- shades of grey).


Step 6 – Detail First Pass
I keep the chalk (It’s probably my favorite medium and go-to brush) and make a new layer, also set to MULTIPLY. I throw in light strokes to wash the walls with color. Then on a NEW LAYER-NORMAL-OPACITY 100%, I use the chalk to obliterate my harsh window lines that I really didn’t like in the first place. I’m simulating sunlight.

Final Detail
Step 7 – Final Detail
Still with the chalk on my 100% layer, I lay down 25% opacity strokes on the table to simulate more sunlight. Next I DROP ALL LAYERS and SAVE AS. I reopen the drawing in Photoshop, DUPLICATE LAYER, and rename it. Turn on your transform tools and shrink. I’m doing this to duplicate the drawing onto the puzzle he’s working on. It’s an EXACT copy, rather than me redrawing shapey blobs of representational color to signify the duplicated Twilight-Zone-ish situtation of the puzzle. (Like that run-on sentence? hehehe).
Anyway, I duplicate AGAIN and make a super-tiny version, so it’s nearing an infinity of puzzles within puzzles. And we’re done.
A FEW FINAL WORDS:
Okay, so I pulled off the sketch in minutes, and the painting and tutorial in about an hour. I really think the THOUGHT behind the image has potential but I don’t really feel I pulled it off this time. First, the color choice is poor. The room is (obvious to me since its in my brain) a kitchen table . . . but aside from the country backed chair and possibly sunrise light, no one else knows it’s my kitchen. I think a country-kitchen type wallpaper, utensil on the wall, or other such element can pull this together. Secondly, the more I look at it, the more it looks like a mental hospital. I didn’t intend to freak anyone out with the setting, but more the fact that the subject is completing a puzzle on multiple levels.
I think I have the proportions correct, and the viewing eye goes where I want it to, but somethings amiss. I need to step back, like so often I should, and look at it again tomorrow. Any thoughts you have would be welcome. As I write this, it occurs to me I show you where I designed your eye to follow. Here’s the snapshot:
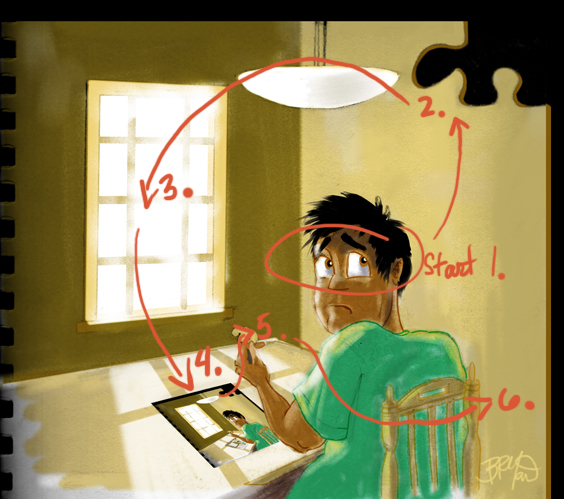
Puzzle Eye Diagram
See you in the funny papers!
Cheers,
Bryant
More Cartoons Like This:
- Easy Come Easy Go Easy.com Easy.go...
- Call of Duty Modern Warfare 2 Gamer Calls in Sick Yay! Xbox Call of Duty 4: Modern Warfare went...
- Sexy Backless Dress Another fun tutorial for the folks at Cartoonaday. If you're...
- Undie Bomber At Home Nigerian man tries to blow up airliner with underwear Christmas...
- UNLV Rebel Basketball Tutorial Las Vegas, Nevada UNLV Runnin’ Rebel Basketball Tutorial Yay, it’s...